

Endometriosis Foundation of America
Endometriosis 2013 / Endometriosis Video Lectures
Ted Lee, MD
Intracorporeal knot; with intracorporeal knot you basically wrap the suture twice on the surgeon's loop first. Then you want to make sure you knot lays flat. Then you just reverse doing your drop, forming the loop. The loop is crucial to make that intracorporeal knot. The key is to have a twist to bring close together to be almost two instruments rubbing together against each other when you form the loop. At least that is how I do it. And I will do it a little bit differently. So that is the intracorporeal knot.
I will show you that you can actually, on purpose, make an air knot by making a slip knot. This is how you do it. You just pick a probe, a single probe and once you have done that you reverse your probe and form a square knot. So you reverse your probe and you form a square knot. When you pull, this will form basically an air knot. You can reconfigure the knot by pulling in that direction. This will change the configuration of the knot and turn it into a sliding knot a slip knot. You can do this for robotic surgery, you can do it with traditional endoscopic surgery it does not matter, a knot is a knot. The rest you finish as you would have done with a regular intracorporeal knot.
All these videos are going to be on the laptop, so set the laptop next to you, all the videos are for you to review as you are doing it. We have a lot of instructors here but you can bring out the videos and look for yourself, do self instruction.
This is an extracorporeal slip knot. This is like a bonus knot. Basically if somebody dropped your knot pusher instead of screaming and yelling and scrabbling for wherever the knot pusher has been dropped, you can do the extracorporeal slip knot. It is great for cinching the vascular pedicles, so if you want this is how you do it.
So this is in slow motion. Basically you wrap the switcher around your index finger. Flip about five or six times. Then use a hemostat and thread through the loop you already formed beneath your index finger and pull that suture through. Let go of the hemostat and that is your slip knot. That was in slow motion. Let us look at it in real time. So that is your knot there. That is a slip knot and...pull through the tool when you try to approximate tissues at the tension. This is the same suture knot laced up, feel from different angles. Wrap five or six times, go through the loop, grab the suture in the end, again, all these needles will be in all of that...here. Wrap it tight, slip, pull, it will go inside. This is what it looks like. This is actually an extracorporeal slip knot. This can come in handy.
A lot of times when you do a lot of...defect...close defect, a running suture is the best thing for that. Before there was barbed suture you had to tie an intracorporeal knot in the beginning and an intracorporeal knot at the end. Basically that is what you do when you do running suture. You can end the knot with an intracorporeal knot...not the same. The key is to do two passes, do a figure eight and pull; figure eight and pull. That is important because we do a figure of eight and pull that will make it much more efficient. You do not want to pull the suture, every time you pass the tissue, so figure of eight, pull; figure of eight and pull, that is very important.
This is like a uni-loop, a loop I sort of use and tie myself. ...
You make this, basically this is the same kind you use to secure a hook through the line when you go fishing. You will wrap it six times; in this case you only wrap it two times. Tie it to the mesh and obviously with the... or barbed sutures it almost makes this thing quite obsolete. This is before the V-Loc...the loop. This was before the V-Loc was available. Then the loop will cinch up itself. What you do is you put the loop through the shaft of your needle holder. That way it is already threaded. When you suture you will automatically thread through the loop already, automatically. This is an actual...I am going to try to close the peritoneum. We will grab the suture. So now the loop that I have already in the shaft of my needle is ready. Then we do the figure of eight basically... It is just I missed some area here. I am going to take out the fibroid here. With that, I am just going to pull the suture the loop will automatically feed into the area of...that loop is already there, you just pull and that is your anchor and suture... You do the rest of the running suture. You do running sutures you do two passes, two passes and pull, two passes and pull. Instead of pulling every time you do two passes and pull. That will increase efficiency and speed of your suturing. We will finish that up with basically a helicopter knot, do another figure eight. Basically two passes and pull. That is how you should usually do running sutures. Do not try to pull the suture every time you...the tissues. That is economy of motion.
The reason...itself to form the intracorporeal knot is look at the helicopter knot, it sort of like helicoptering around the posts. This is another way to intracorporeal knot. I guess with the...and the barbed sutures it will make this not as useful anymore but at times I still do this. That is how you close the inside of the...cut the suture there. Let us go to the next one.
So lapraty is a great device and we have a lapraty here. It is basically what could be end of suturing serves as the anchor and also serves as a finishing up. This is - I already have lapraty preloaded on a suture. I am closing the cuff. Lapraty will keep it in place I am still on running suture and I will finish with two clips. So when you close the vaginal cuff make sure you have put the size...this cuff is very, very thin. Again, I am doing a figure of eight as I mentioned to you before. When you do running sutures you want the figure of eight and then pull. That way you proliferate efficiency. The thing is when you use barbed sutures the figure of eight might makes it difficult for you to pull through the tissues. So that is the difference between your regular running suture with regular sutures versus the barbed suture. The barbed suture you do not want to do if you...get caught...pull through tissues. That is your vaginal cuff using lapraty.
The barbed suture: We have two different versions of barbed suture; one is your bidirectional, used to be quill but now...and then we have a V-Loc. It is probably the best invention since sliced bread. I have been closing bladders and rectums using the barbed suture, 3-0 barbed sutures. It works out great because it makes things much faster. Obviously if you get a small defect you will not be using a barbed suture. "In thinner tissues it does not work", which is not true because I have been closing peritoneal defect...using the barbed suture as well.
With that - if anyone wants to go over the vaginal cuff closure it is my vaginal cuff angled closure. The vaginal cuff is no...in the sense that people pay attention to. Make sure you use a big needle, figure out a good bite and you want to use monofilament sutures. That will be better for healing.
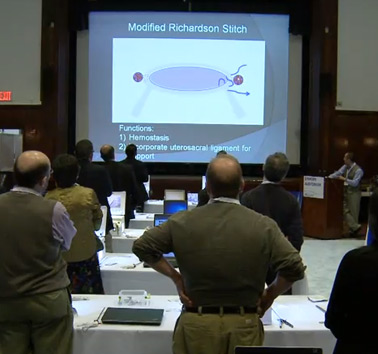
I do a modified Richardson stitch, which is for the purpose of hemostasis as well as incorporation of uterosacral ligament into your cuff closure. Most of the bleeding in the vaginal cuff is in the vaginal cuff angle medial to the uterine pedicle. The modified Richardson stitch goes out/in, out/in, in/up. Here is my monofilament stitch, here is the cup angle and here is the pedicle, uterine pedicle. Out/in, the next stitch is in/out. Here is the pedicle again, so behind the pedicle - so the first one was in front of the pedicle and the second one is behind the pedicle. When I do the last stitch in and out incorporate a portion of the uterosacral loop you can see is right here. Lift up the vaginal cuff angle. That will essentially be the same for the ligaments right there, so we incorporate that into your vaginal cuff angle. Let us tie that either with the extracorporeal knot or intracorporeal knot. That is basically your vaginal cuff angle. It will make your cuff...hemostatic.
Here is the barbed suture. Here is a cuff angle and it uses the same barbed suture stitch. Out/in. In/out. This was all medial this was before...was available so I was using Quill suture then I made my own loop that I have shown you previously. I think...stole my idea. Then we will thread it through. It is pre-threaded already so it is going to go through that little hole there. You basically just pull at the loop tight against your suture and then you finish the rest of the vaginal cuff just like that. When you pull it back the cuff angle here is going to be very... The rest is...through it.
I think that is it for my talk. Basically suturing is waxing on, waxing off. It is a very - it needs lots and lots of practice.
This is the laparoscopic version of waxing on, waxing off. Make a loop, make a loop, regress your loop. Wax on/wax off. This needs lots and lots of practice.
The moral of the story is perfect practice makes perfect.
Thank you.